A Step-by-Step Installation Guide
This guide is designed to provide a detailed walkthrough for setting up an FPV (First Person View) system using OpenIPC. It is structured into several key steps.
Key Steps Overview
- Choosing hardware
- Air Unit setup
- Ground Station setup
- Flight!
Choosing hardware
Step 1: Ground Station choice: SBC GS vs PixelPilot
Step 1.1: Basic understanding
SBC GS and PixelPilot is software/hardware combo that can be used as video receiver for OpenIPC FPV system. SBC GS is built using SBC(single board computer) as hardware and software that is maintained by OpenIPC FPV dev team, it has cutting edge features because of ease of development while being harder to setup and use. PixelPilot(PP later) on other hand is software package that uses Android device as it’s hardware part, in most cases it has less features but it is a lot easier in setup and use.
Step 1.2: Hardware choice
- SBC GS can use RTL8812EU and RTL8812AU and Radxa zero 3w/3e.
- PP can use only RTL8812AU and Snapdragon based Android devices(Meta Quest too).
Step 1.3: Performance
Performance vise PP will outperform SBC GS in computing power and latency in most cases, radio-stack performance depends on chosen Net cards and antennas. SBC GS has advantage in Net cards choice factor, it has BL-M8812EU2 support which is considered superior for GS use.
Step 1.4: Buying Ground Station
- Premade SBC GSes are sold, examples are RunCam WiFiLink-RX and Emax Wyvern Link OpenIPC Goggle VRX, which are considered good and proven by OpenIPC FPV devs. For SBC GS you need a good analog goggles with low latency HDMI input.
- For PP Ground Station you need Android device which is based on Snapdragon SoC and at least 1 AU based Net card. Meta Quest VR HMDs series is tested and proven to work with PP effortlessly, to install PP on Quest series you need to use SideQuest.
Step 1.5: Cost comparison
- For SBC GS you need a good analog goggles, recommended goggles are: **HDZero BoxPro(299 USD), HDZero Goggle(649 USD), Skyzone SKY04O(), Skyzone SKY04O pro(), Skyzone SKY04X PRO() and SBC GS itself which is priced about 90-100USD. But it is cheaper approach if you already have good analog goggles.
- For PP you need a Snapdragon based Android device and at least 1 AU based net card. Some air units are sold with bundled AU based net card specifically for that, notably - WiFiLink G set. For better experience you can use VR case for your phone or Meta Quest.
Step 2: Choosing air unit
Step 2.1: Basic understanding
Air unit(can be called VTX) is video transmitting device that runs OpenIPC firmware and sends video to ground station wirelessly. Air unit has 3 main components: sensor, SoC, transmitter.
Step 2.2: Hardware choice
- Sensor: 2 main sensor models are IMX335 and IMX415. IMX335 has superior image quality and more performant modes(up to 1080p@120FPS) while IMX415 has worse image quality in general and best mode is 1080p@90FPS(720p@120FPS is supported).
- SoC: 2 main SoCs are SSC338Q and SSC30KQ. SSC30KQ is cut down version of SSC338Q(1 vs 2 cores). With SSC338Q you can get future-proof air unit with enough performance for basically any new firmware updates.
- Transmitter: There is 2 main transmitter types RTL8812EU and RTL8812AU. They are basically same in terms of performance. Most sold air units are RTL8812EU based.
Air Unit setup
Step 0: Basic understanding
With PnP introduction air unit setup is just updating it’s firmware to latest version.
Step 1: Connection to FC
OpenIPC air units that are available on market are using HD plug connector, so connection to FC is performed in exactly the same way as other digital FPV systems.
Step 2: Companion installation and Ethernet configuration
Step 2.1: Companion installation.
To install Companion you need to download the latest version of it first from here and follow installation instructions listed there.
Step 2.2: Ethernet configuration.
Step 2.2.windows
- Connect your air unit to your PC`s Ethernet port with the Ethernet cable(or USB debug port).
- Open up a windows file browser, scroll down on the left bar and left click on Network, select properties.
- Select change adapter settings
- Double click on Internet Protocol Version 4
- Enter numbers exactly as seen on image below.
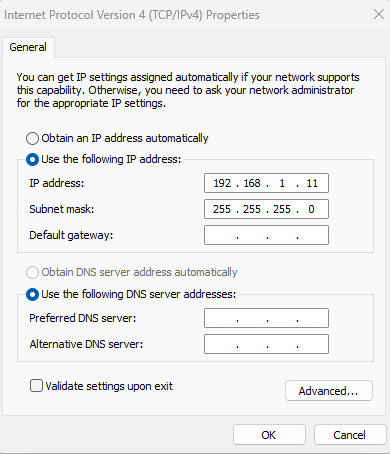
- Done
Step 2.2.macos
- Connect your air unit to your PC`s Ethernet port with the Ethernet cable(or USB debug port).
- Open Settings.
- Continue as in the screenshots below.
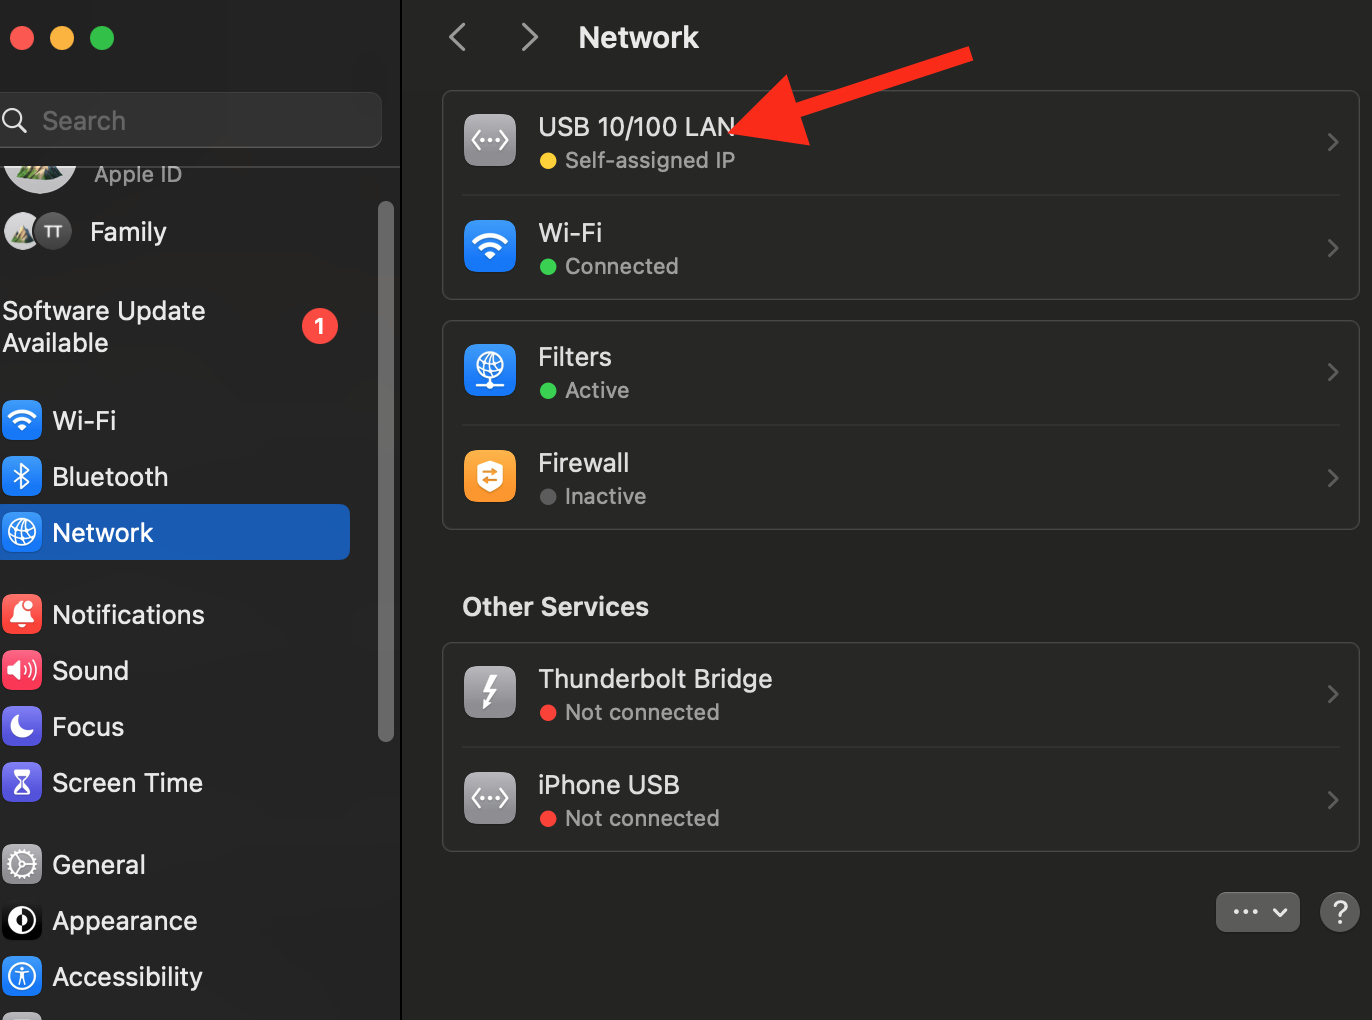
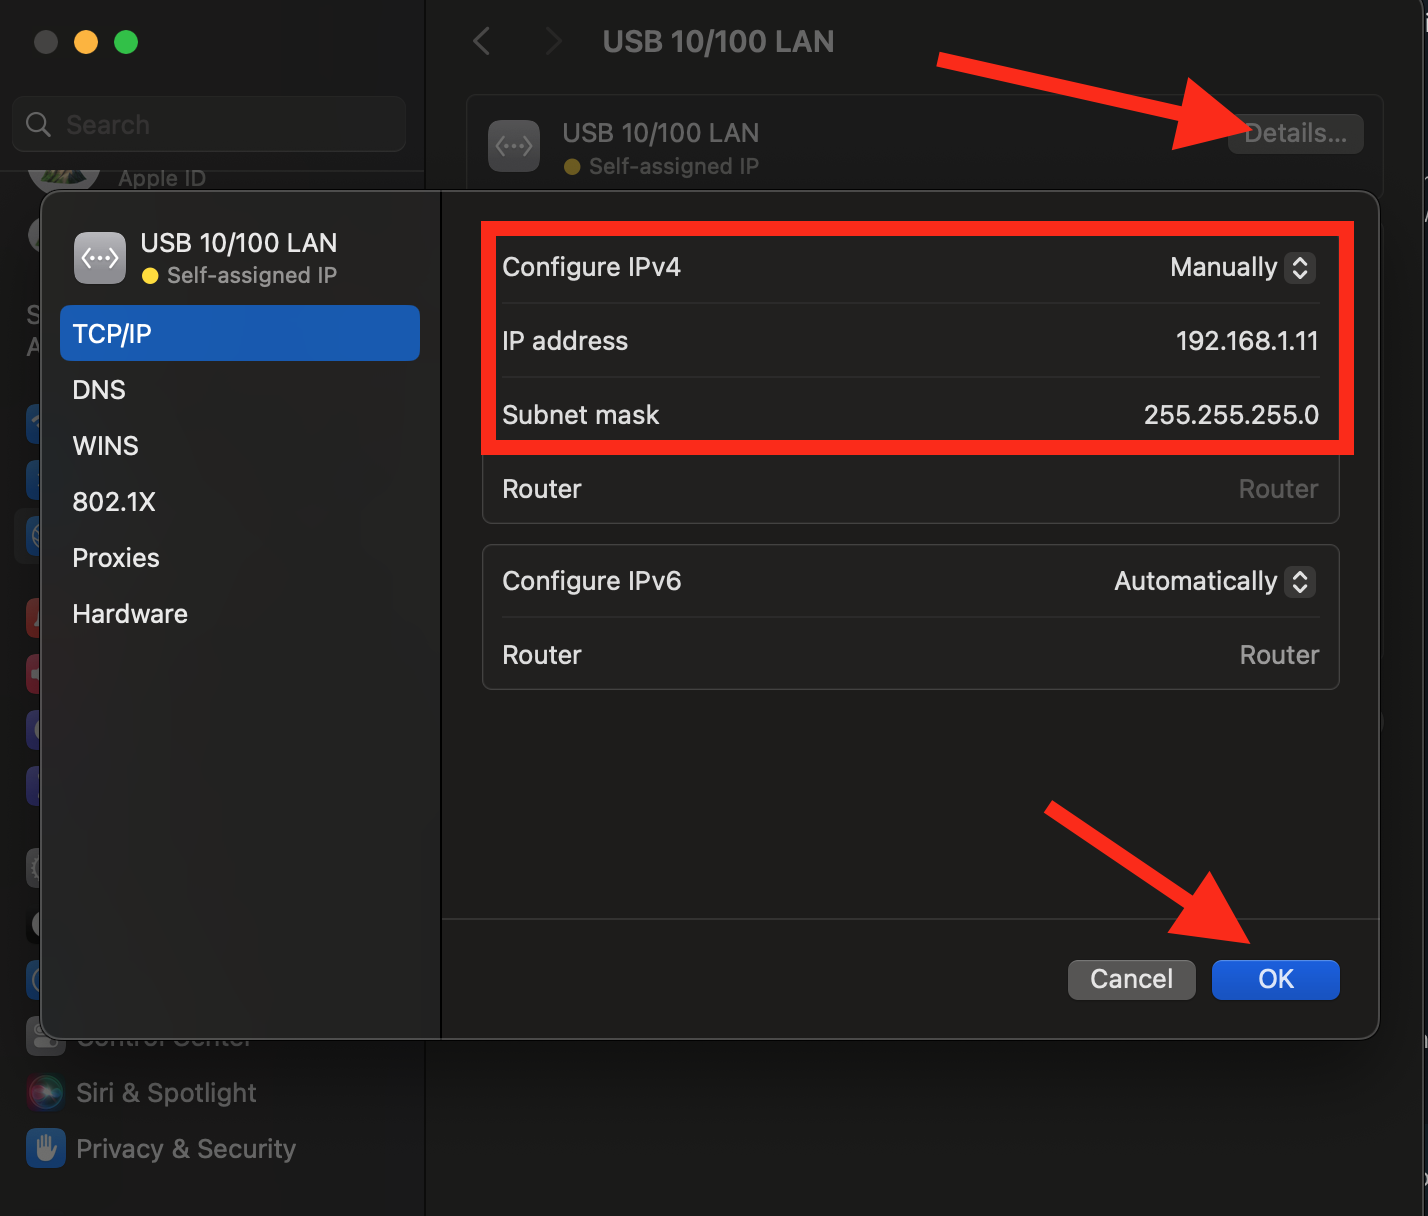
- Done
Step 3: Firmware update.
Step 3.1: Connecting air unit to a computer
- Connect Ethernet cable to your air unit. ![image]/images/ethernet-cable.png)
- Connect another end of Ethernet cable(or USB debug port) to your PC.
- Power on your air unit using battery or USB debug port.
- Connect to air unit using OpenIPC Companion with this credentials.
| IP | Password |
|---|---|
| 192.168.1.10 | 12345 |
Step 3.2: Firmware update
After successful connection go to firmware tab and select firmware mentioned in hardware article for your air unit, then press “Update” button. 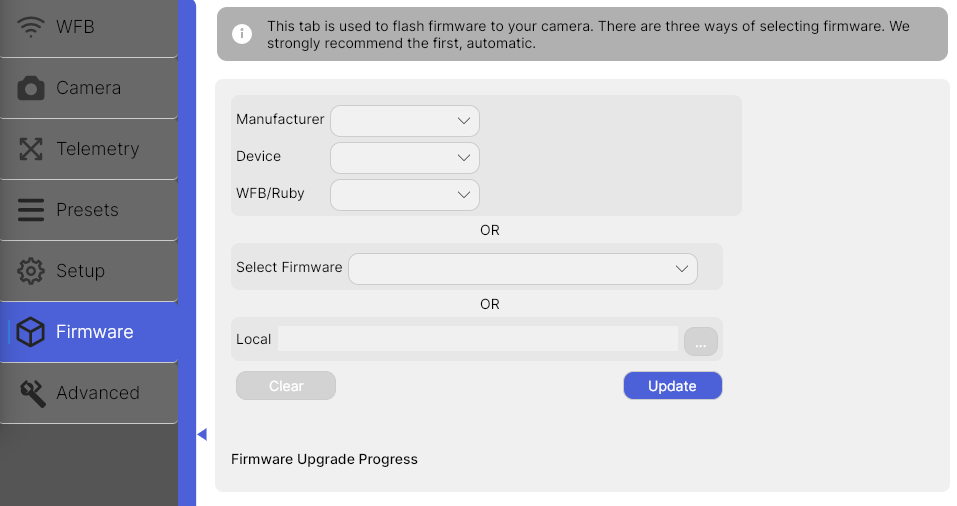
Step 4: Power settings
Power level as standard is set to 0(pit mode or 25mW). You can change it in VTXMENU in basic settings section. To set higher power output - just choose higher number then choose save, please reboot after that.
Ground Station setup
If you are using SBC GS follow steps that have .SBC ending, for PixelPilot .PP
Step 1.SBC
For that you need a SD card that is 8 or more GB in size.
Step 1.1.SBC: Firmware update
Please go to SBC GS and download Radxa zero 3W/E 2.0.0 beta 2 stock image that is maintained by @JohnDGodwin. Extract downloaded .xz file and flash contents to SD card using balenaEtcher or another similar program of your choice.
Step 1.2.SBC: Basic setup
After flashing SD card replug it to PC and open new directory called config, open file setup.txt with text editor and perform this:
- Set your desired screen resolution and refresh rate in the screen-mode file. Format is WxH@fps — Common values would be 1920x1080@60, 1920x1080@120, 1280x720@60, 1280x720@120. This does not need to match your camera settings, you want to set it to either the highest framerate or highest resolution the screen is capable of.
- For smooth DVR playback, set the rec_fps to the fps at which your camera is shooting. e.g. 60, 90, 120
- Set your GPIO layout. Accepted values are Ruby, Bonnet, Runcam, and Custom.
Step 1.PP
All you need is Snapdragon based Android device and at least one RTL8812AU based net card.
Step 1.1.PP: Install and fly
To download PixelPilot you need to go to this link and download the latest version of it. Then install it on your device as standard application(for Meta Quest you need to use SideQuest for that). After installation run it and give access to VPN, then connect net card and you are done.
Flight!
Do not push this system too far on first few flights, you need to be used to digital FPV system if you are coming from analog system. Your link performance can be bad in city areas because of a lot of WiFi access points, If you have bad performance - consider switching to different channel. If issues persist - change OTG adapter if you are using Android GS.